The post highlights simple and convenient strategies to fix Call of Duty Warzone crashing on Windows 10, 8, 7 PC.
We can understand it is extremely annoying to face frequent crashes while enjoying a battle in an action-thrilled game, Call of Duty: Warzone. And, it is also tougher to find the specific reason for this issue. Because there are multiple causes behind Call of Duty Warzone crashing. We have mentioned the core ones below.
- May be caused due to a random game bug.
- Game crashes because of outdated or broken graphics card drivers.
- PC doesn’t meet minimal Call of Duty: Warzone specifications.
- Corrupted game files.
- Maybe, third-party software is conflicting with the game.
As we had already made it clear that it is a bit complicated to detect the exact cause for this issue. But, don’t worry, whatever the cause is, the below-mentioned troubleshooting ideas will help you in order to get rid of this issue.
Universal Method to Fix Call of Duty Warzone Crashing on Windows PC
Unable to find the most latest version of graphics drivers online? Don’t worry, use Bit Driver Updater, a globally recognized driver updater utility to get rid of all faulty or out-of-date drivers. And, the software only offers WHQL tested or signed drivers. With this driver updater utility, you can perform bulk driver downloads at once. Try Bit Driver Updater for Free from the button shared below.
How to Fix Call of Duty: Warzone Crashing Issue on Windows 10, 8, 7 PC {Easy Fixes}
When it comes to dealing with the crashing issues, then here are multiple solutions that you can consider. Below, we have put together 7 diagnoses to fix Call of Duty Warzone crashing issues quite easily & quickly. Now, without further delay, let’s read them and pick the ideal one.
Fix 1: Install the recent Game Patch
It is pretty obvious that new games generally come with bugs, but a big thanks to developers for releasing new patches frequently to fix them. So, when you realize that Call of Duty Warzone keeps crashing on your Windows 10, 8, 7, then the very first thing you should do is to check for the latest updates. And, if any update is available then install it instantly.
If you did so, and still the Warzone is crashing, then you can try the below-mentioned troubleshooting solutions.
Fix 2: Modify Graphics Settings
Quite a lot of Call of Duty players reported that texture streaming triggers game crashing issues. It is a new feature enumerated in the latest Call of Duty Warzone update.
Hence, it is suggested you disable the Texture Streaming feature. Along with it, setting the lower graphics settings also helps you to enhance the regularity of the game. After trying this fix, if Call of Duty Warzone keeps crashing then move on to the other advanced solutions.
Read More: How to Update Xbox One Controller Drivers for Windows 10?
Fix 3: Close Background Apps
Possibly your background running applications are conflicting with Call of Duty Warzone and prompting game crashes. Therefore, you need to close all the applications running in the background. You can follow the steps shared below to close the unnecessary background applications:
Step 1: Click right on any void place in the Task Bar to choose Task Manager.
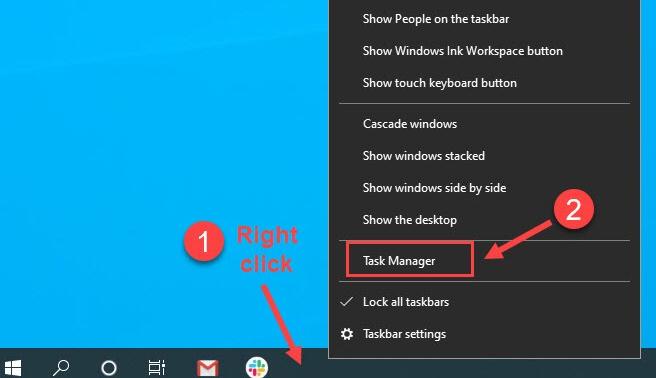
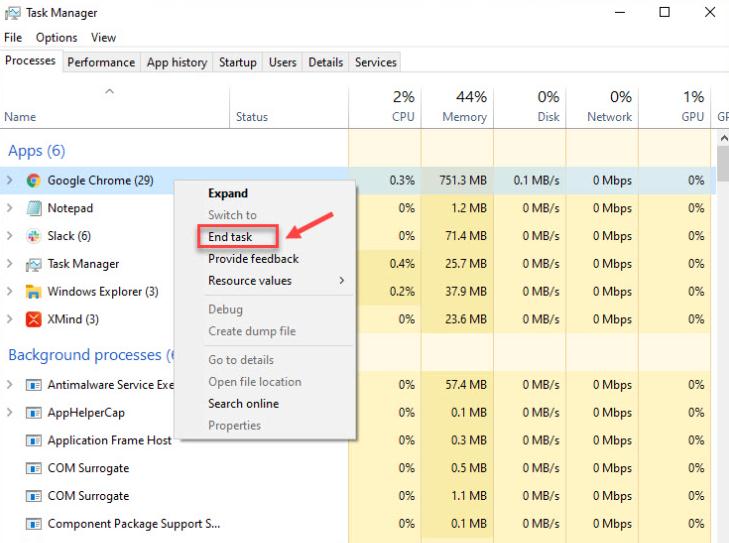
Step 2: After this, make a right-click on the program you want to close.
Step 3: Lastly, click the End Task option.
After closing all the unnecessary background applications, re-launch the game just to ensure whether Call of Duty Warzone now working. If COD Warzone still crashes, try the next solutions.
Also Know: Quick & Easy Ways to Fix “Could Not Connect to the Steam Network” Error
Fix 4: Update the Graphics Driver
Outdated graphics drivers are the main culprit behind the crashing issues during the game. Hence, in order to fix Call of Duty Warzone crashing you should try to update the graphics driver. Graphics drivers can be updated either manually or automatically. However, it is a bit harder to find the correct and most up-to-date driver manually as it requires a decent amount of technical knowledge. Also, it takes a pretty long time.
Therefore, it is advisable to use the best driver updater tool for performing automatic driver update. Even though there are numerous driver updater tools available in the market, out of all, Bit Driver Updater is gigantically famous among PC users. It is the globally acclaimed driver updater utility that can fix all the driver-related queries quite effortlessly.
The tool neither requires any sort of manual support from the users’ end nor any special technical knowledge. All you need to do is a quick installation of the software on your system and sit back until it installs the latest drivers.
Follow the simple steps shared below to update drivers via Bit Driver Updater:
Step 1: Click on the download button shared below to download and install Bit Driver Updater on your PC.
Step 2: Next, launch the utility on your PC, and wait a while until it completes the scanning for outdated or faulty drivers.
Step 3: After a deep scan, it provides you a detailed list of the drivers that require an update. You need to review the entire list and find the problematic graphics driver.
Step 4: And, click on the Update Now button presented next to it.
Important: If you want to update the rest of the drivers too, along with the graphics driver then you can do so just by clicking on the Update All button instead.

Bit Driver Updater is available in two models, i.e, Free or Pro version. However, a user can absolutely use the free version in order to get drivers installed and updated. But, keep in mind, that the free version won’t let you access the advanced features of the utility.
Whereas, the pro version will give you unlimited access to all of its features including 24/7 technical help desk, scan scheduling, one-click driver update, backup & restore, and many more. In addition to this, the most exciting thing about the software is that it offers a 60-days money-back guarantee. Isn’t it amazing?
Also Read: Fix Rust Keeps Crashing Issue [Resolved]
Fix 5: Check the Integrity of your Game Files
Damaged, missing or corrupted game files are also responsible for the Call of Duty Warzone crashing issues on Windows 10, 8, 7. But don’t worry, you can fix this by repairing the corrupted game files. And, this can be done by using the Blizzard application (Battle.net). Follow the steps shared below:
Step 1: Open Blizzard Battle.net client.
Step 2: In the left menu pane, locate and click on the Call of Duty MW.
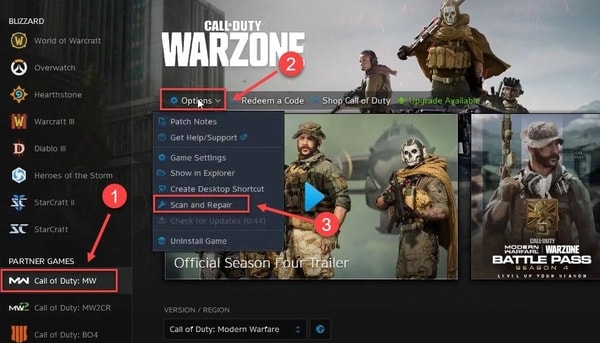
Step 3: Next, click on Options and then choose the Scan and Repair option from the drop-down menu list.
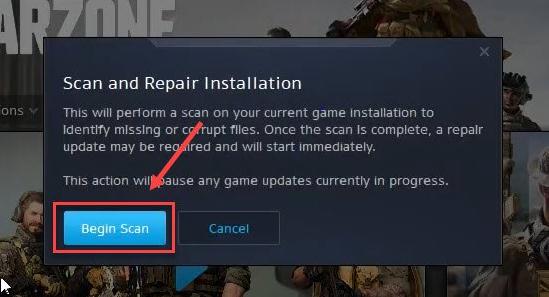
Step 4: After this, click on the Begin Scan option.
Now, launch the Warzone game again and check to see if Call of Duty Warzone now working. If not, then don’t waste time, try the next fix.
Fix 6: Rename the Game File
Though this method may sound a bit bizarre, it helped many gamers to get rid of the random game crashing issues like Call of Duty Warzone crashing and may work for you too. Below are the steps to rename the game file:
Step 1: Trigger Battle.net client.
Step 2: In the next prompt, click Call of Duty: MW from the left menu pane.
Step 3: Next, make a click on Options and then Show in Explorer.
Step 4: After this, try to open the Call of Duty Modern Warfare folder.
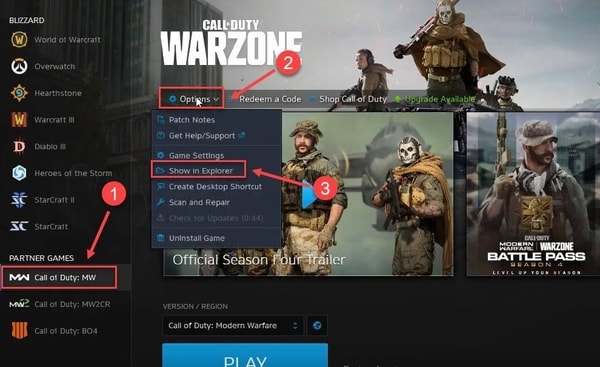
Step 5: Now, find the ModernWarfare.exe file and make a double click on the file to rename it.
Launch Call of Duty: Warzone and check to see if it is working accurately or not.
Fix 7: Reinstall Call of Duty: Warzone
If nothing has helped from this troubleshooting guide, then you need to uninstall and then reinstall the game. We know it is quite a hefty task and many users don’t want to get it performed. But, sometimes performing a clean install the game fixes coding issues that normal troubleshooting tips can’t do.
Also Read: Download, Install and Update Microphone Driver for Windows 10
Call of Duty Warzone Crashing on Windows PC: Solved
So, these are some possible strategies that you can try in order to make Call of Duty Warzone work again. We hope you have liked this troubleshooting guide on how to fix the Call of Duty Warzone crashing issue.
Still, if you have any queries then tell us in the comments below. We will do our best to help you. You can share your further suggestions too through the comments below.
Before you go, do subscribe to our Newsletter for getting more troubleshooting guides just like this one.


