The device is connected to WiFi but no internet is available at all. Are you experiencing this issue? If so, then don’t panic! This troubleshooting guide will help you to access the proper internet connectivity.
The internet is a wonderful place to be in, as long as you’re connected. Internet connectivity issues are one of the most irritating errors as they can stop the total flow of your work or surfing.
The internet connectivity problems can be classified into two categories; First, that you are unable to connect to the internet, or Second, that you got connected but can’t access the internet. People with wireless connections may have to face pop-up messages saying “WiFi connected but no internet” which signify that you may have connected to your router or modem correctly but can’t access the internet.
To make sure that this issue is rectified, check if the error is prompted on only a single device or the whole network. Knowing this can help in resolving the problems and know how to proceed further.
What Causes Internet-Connected But Not Working Issue
The “internet connectivity” error is represented by a small black exclamation mark contained in a tiny yellow triangle, in Windows. In android or Ios, it is commonly represented by a black exclamation mark.
When you see the sign and message that means that you may have connected to the local router or modem but you can’t access the internet. The common cause of this denial can be:
- PC’s WIFI adapter has gotten faulty
- Your internet service provider has been down
- The computer has an incorrect IP (internet protocol) address
- Security software (antivirus) is restricting the access
- DNS cache has gotten corrupted
- Wireless drivers have gotten outdated
- DNS server settings are configured wrongly and so on.
What will you See when this Issue Occurred
The error sign is prompted by one of the following messages:
- WiFi connected but no internet
- Connected, no internet access
- WiFi has no Internet Access
- No internet connection
Initial Workarounds to Fix WiFi Connected But No Internet Error
Before we proceed towards the advanced solutions to fix this issue, there are some possible tweaks that can resolve the network connectivity issues. Read them below:
Restarting your system: Whenever you run into an issue, always try to restart the device first. Maybe, the issue is not that impactful, so restarting the system could make your device work again.
Try to use another system: This will determine whether your system is only connected to WiFi but has no internet access or another system also struggling with the same issue.
Try to Reboot Your Modem/Router: Rebooting the modem or router is another initial hack that one can consider in order to fix WiFi connected but no internet access.
After trying the above two easy but effective workarounds, still, the issue remains the same, then you can try the advanced resolutions mentioned below.
Solutions to Fix WiFi Connected But No Internet Issue
Below we have put together 3 simple solutions to deal with this issue. Let’s read more about them!
Solution 1: Run Windows Network Troubleshooter
Windows has an in-built troubleshooter program to detect and fix errors. So, the user can run a Windows network troubleshooter in order to deal with this issue. Here are the few steps which you need to follow:
Step 1: Open Windows Settings by pressing the Windows logo + I keys at a time.
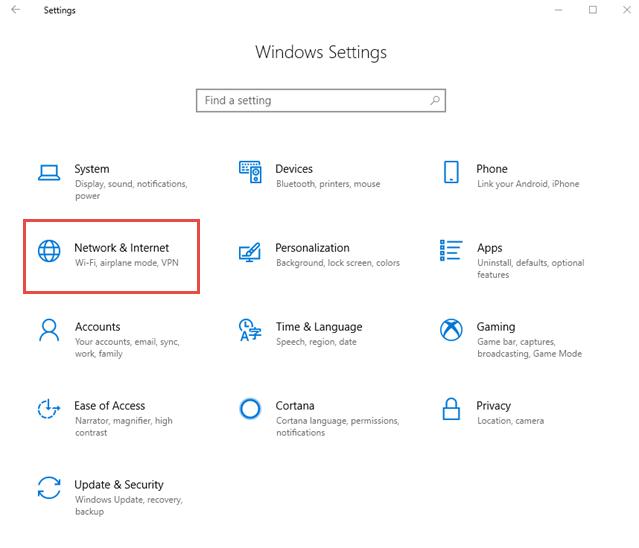
Step 2: After this, find and click on the Network & Internet option.
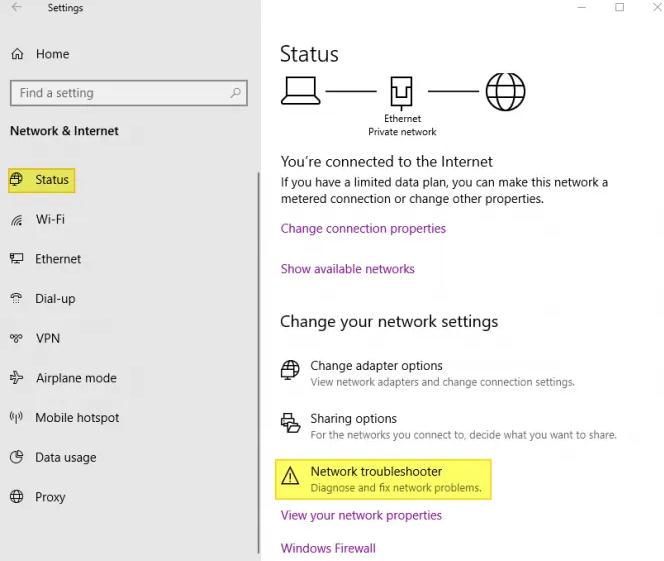
Step 3: Now, you will see an option named Status in the left pane menu. Click on that option.
Step 4: Then, make a click on the Network Troubleshooter option.
That’s it, once the steps are complete, check to see if it fixes the error. In case, it doesn’t work, then move on to the second solution.
Solution 2: Turn off Fast Startup
Connected to WiFi but no internet access? Don’t panic, try to turn off the fast startup feature if you use it. Because, a lot of times, this feature may interfere with your network connection. Therefore, disabling this feature can make the network work again. Follow the steps shared below:
Step 1: Launch the Run dialog box by hitting the Windows + R keys at the same time.
Step 2: Now, input Powercfg.cpl and click on the Ok option.
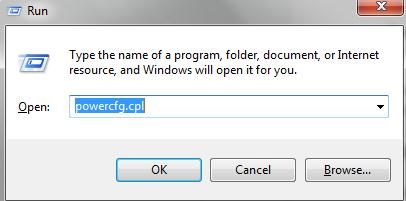
Step 3: This will take you to the Windows Power Options menu.
Step 4: After this, from the left, make a click on Choose What Power Buttons do.

Step 5: Next, choose Change Settings Currently Unavailable under the Define section.
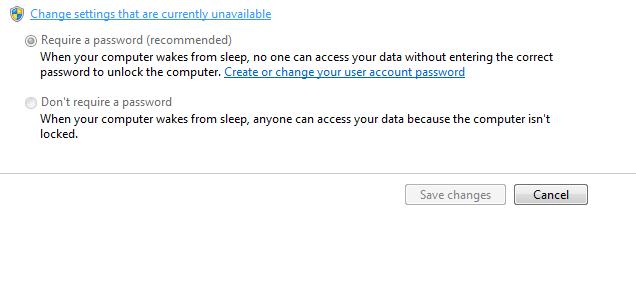
Step 6: In the next prompt, there is a Fast Startup option, under Shutdown Settings. Unmark the fast startup option and click on the Save option.
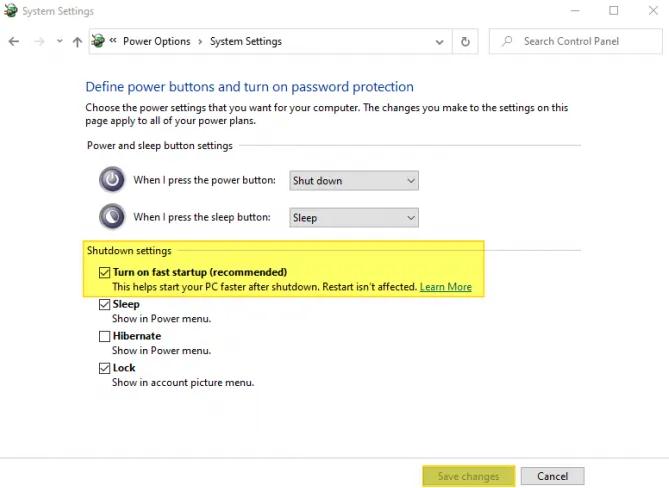
Thereafter, check to see if you get the Internet access back. If not, try other solutions mentioned below.
Solution 3: Updating Network Adapter Driver
Outdated network drivers are the major culprits behind the faulty behavior of connections. And, it doesn’t matter whether you are encountering internet-connected but not working issues or not, you should always keep the network drivers up-to-date. Because updated network drivers ensure the proper connections.
To update the drivers, one can either choose the manual method or the automatic method. But, we will advise you to go with the automatic approach as it takes minimal time and requires no special technical knowledge.
There are a lot of driver updates available to perform automatic driver updates. Out of all, we like Bit Driver Updater and recommend you the same. It is the best driver updater utility that one can ever have. With the help of this driver updater, you can update all the outdated, broken, and missing drivers with a click of the mouse. Along with it, you can also diagnose numerous Windows-related issues too.
Now have a look at the steps that you need to follow in order to update network drivers via Bit Driver Updater:
Step 1: Firstly, download the Bit Driver Updater. You can do that from the button shared below.
Step 2: After this, run the setup file and finish the installation by following the on-screen instructions.
Step 3: Next, launch the utility on your system and let it scan your PC for faulty drivers.
Note: You can also search for the drivers manually by clicking on the Scan button from the left pane of the menu.
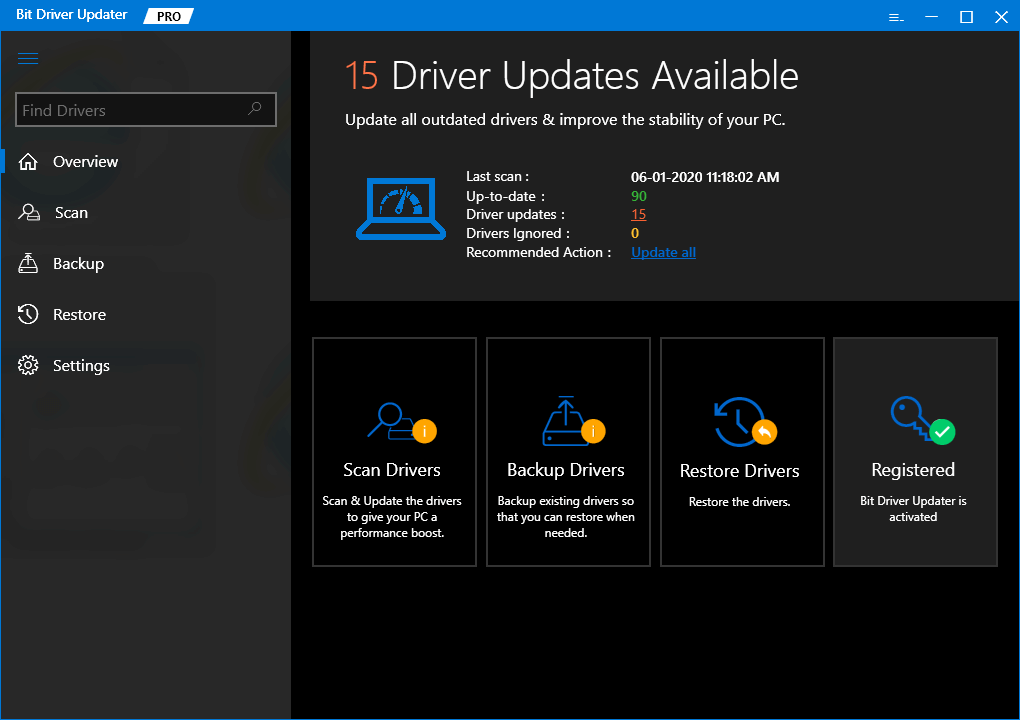
Step 4: Once the scanning is finished, it provides you with a detailed list of outdated drivers, go through the entire list and click on the Update Now button presented next to the driver you want to update.
Step 5: Either, you can update all the drivers in one click by making a click on Update All instead.

That is it! Now check to see whether the connected to WiFi but no internet issue is solved or not.
WiFi Connected But No Internet Issue: FIXED
So, these are some possible tactics you can use in order to fix poor network issues. We hope one of the solutions mentioned above will successfully resolve the “connected to WiFi but no internet” issue. However, after trying all the solutions, still you have no internet across your device, then you should seek help from an IT professional technician.
Drop your further suggestions in the comment box below. Lastly, to read more troubleshooting guides like this one do subscribe to our Newsletter.


