Have you come across the DNS server not responding error? Are you unable to access websites through the internet? When you open the Windows Network Diagnostic Centre to troubleshoot the problem, you get a message like the DNS server isn’t responding on Windows 10.
If so, then you are on the right page as our blog will give an in-depth understanding of what is this error and how you can solve it easily.
What is the DNS Server?
The abbreviation DNS refers to the Domain Name System. It is a decentralized naming system for computers and services that connect to the internet or interact with it via a private network .
Why Is It Needed?
In Windows systems, the DNS server has the following functions:
- It is used to translate the website address to the IP address. This helps computers as they need the IP addresses to access all sites.
- Computers store DNS responses so that every time you access previously visited sites, the system need not send the DNS request to the website for previously used domain names. So, this improves the page loading speed.
Now that you have a fair idea about what DNS is and its importance, let us look at the solutions to fix the DNS server not responding error.
How Do You Fix “Your DNS Server is Not Responding” Error?
As per our research the below methods will help you fix the Windows 10 DNS server not responding error.
#1. Rectify the DNS Server Address
You may encounter the DNS server not responding problem when the DNS server address is wrong. To rectify the address of the DNS server you can use the below steps:
- Go to the Control Panel and click on the Network and Sharing Centre.
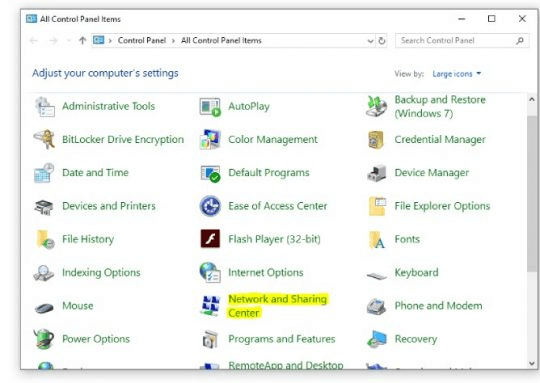
- Click the “Change adapter settings” on the left panel.
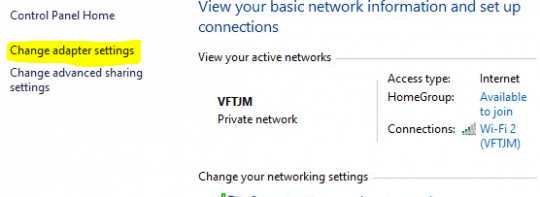
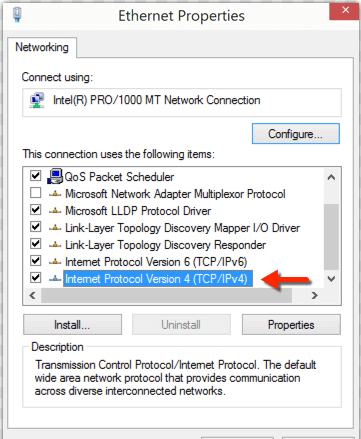
- Then, use right-click to open the Properties window of Local Area Connection, Ethernet or Wi-Fi as per your Windows.
- Click “Internet Protocol Version 4 (TCP/IPv4)” followed by clicking the Properties button located below.
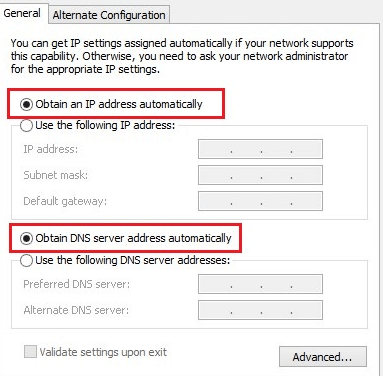
- Here you can select the “Obtain IP address automatically” option and “Obtain DNS server address automatically” and further click “OK.”
- Again select the “Internet Protocol Version 6 (TCP/IPv6)” and click the Properties button located below.
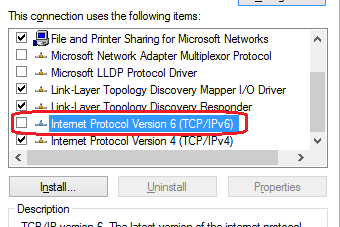
- Select the “Obtain IP address automatically” option and “Obtain DNS server address automatically” and click “OK.”
Finally, restart your computer and attempt to access the website which you were trying to visit earlier to verify if this solution worked for you. If you are still greeted by the DNS server isn’t responding, then use the subsequent solutions.
#2. Clear the DNS Cache and Reset the IP Address
If you are wondering how to clear the DNS cache to get rid of the DNS server not responding on Windows 10 error, then here’s a way to do it:
- Open the Command Prompt and run it as an administrator. When asked for permission, select “Yes” for the prompt of the User Account Control.
- Type the following commands followed by pressing Enter after each command:
ipconfig /flushdns
ipconfig /registerdns
ipconfig /release
ipconfig /renew
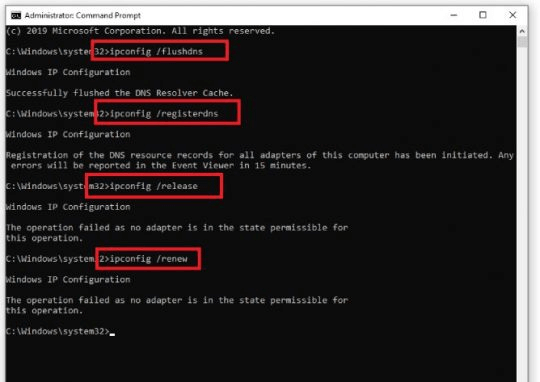
After this, restart your computer to see if the DNS server not responding issue is resolved or not.
#3. Disable Your Antivirus Program
Most of the time, a third-party antivirus solution is seen to cause abrupt issues with your computer functions. These may include issues with system start up, issue with audio output, a slow and sluggish system, DNS server not responding issue, forcible hooking into other software pieces of your computer, and a lot many issues.
What we recommend is that you temporarily disable your antivirus solution to see if this was the cause behind the problem of the DNS server not responding on Windows 10. If so, then you may continue to disable it permanently, followed by acquiring another antivirus software that will not cause such interference.
Remember that even when you are disabling your antivirus application, your system won’t be impacted by the cyber threats if you have a Windows 10 PC as Windows Defender program stands guard for your system protection.
#4. Update Network Adapter Driver
You must be already aware of the fact that out-of-date or faulty device drivers can throw up a lot of system errors. The DNS server not responding error might be the result of outdated or corrupted network adapter drivers on your PC.
In this case, you will need to update the network drivers to fix the DNS server not working issue completely. System drivers may be updated manually or automatically.
While the manual procedure is cumbersome, time-killing, and complicated, the automatic process of updating device drivers is far more superior, quicker, easier, and simpler.
In the manual method of updating device drivers, you will need to visit the manufacturer’s website to search the exact model of the network driver which is installed on your system. Then, you will need to download the self-executable file and run it on your system to complete the installation of the network adapter drivers.
Whereas in the automatic method, all you need to do is install a best driver update software on your system and the rest will be taken care of by the tool itself.
The software automatically scans your system for faulty, missing, or old drivers and then allows you to download and install the latest genuine versions of the respective drivers in just a single mouse click. Here are the simple instructions that you require to implement to update your network adapter driver using this amazing tool.
- Download Bit Driver Updater on your Windows device using the button given below.

- Double-click on the downloaded setup file and then follow the instructions provided by the wizard to install the application on your system.
- After this, open the application and click on the ‘Scan Drivers’ option to find problem drivers on your PC.
- Once you get the driver scan results, locate your network driver and click on the ‘Update Now’ button located next to it.
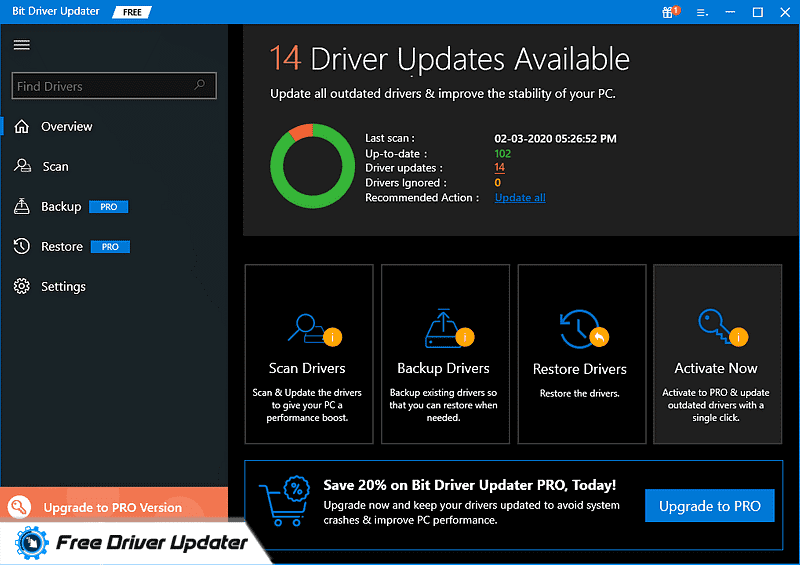
Once you are done with updating drivers, just try restarting your computer to see if you are able to access all web pages like before.
#5. Restart Your Modem or Router
If the above-mentioned fixes have not worked well for you, then there is a bigger probability that there is some issue with the router or modem you use.
Sometimes, if the modem or router of your Wi-Fi/broadband connection doesn’t function properly, then it can give rise to the ‘DNS server is temporarily unavailable’ problem.
In this scenario what you can do is switch it off and restart it again. Post this, you open your web browser and try to access the websites that you were trying to visit earlier.
Summarizing:
Thus, you now know that several reasons such as old or corrupted drivers, interruption from the antivirus tool, problems with the router or modem, or incorrect DNS server address can cause DNS server not responding error.
In the above segments you saw how to troubleshoot these problems. You can always ensure to disable extra connections, clean the DNS cache, and improve your current connection. You can also restart the router/modem or change the default DNS server address. Updating the device drivers is also a good solution for this problem.
Additionally, you can use a VPN also to see if you are able to access web pages normally.
With this I am wrapping up this article. Hopefully, you have found a way to solve the DNS server isn’t responding error from this article.


