Is your Lenovo integrated camera not working on Windows 10/11 devices? If yes, then this article will provide you with different solutions to get rid of this issue within minutes.
Now, people prefer laptops over desktop PCs. The reason is, laptops are all-in-one devices. They come with an integrated camera, speakers, mouse, keyboard, screen, and various other hardware components. When we are talking about laptops, it is impossible to ignore Lenovo. It is one of the leading laptop manufacturers in 2023.
Most professionals prefer and use Lenovo laptops to attend virtual meetings. However, sometimes they report that their Lenovo-integrated webcam not working on Windows 10/11. Due to this, they have missed important meetings or video calls. If you are one of these users, then there is nothing to worry about, this article will help you provide multiple solutions for this issue.
Different Methods To Fix Lenovo Integrated Camera Not Working
Below is a list of solutions that you can implement on your Windows device to get rid of the integrated webcam not working issue.
Solution1: Give The Camera Access
When you update Windows to a newer version, your settings also get changed. Because of these changed settings a lot of issues may cause on your computer. So, there is a possibility that due to morphed privacy settings you are facing the Lenovo integrated camera not working with Windows 10/11. Hence, to make the webcam of your laptop work again, you need to enable the Camera access from the privacy settings. To do so, you can follow the steps mentioned below.
- Open the Start menu’s context list by tapping on the Windows and X buttons simultaneously on your keyboard.

- A new settings window will appear on your screen, over there, navigate your way to the Privacy settings section.
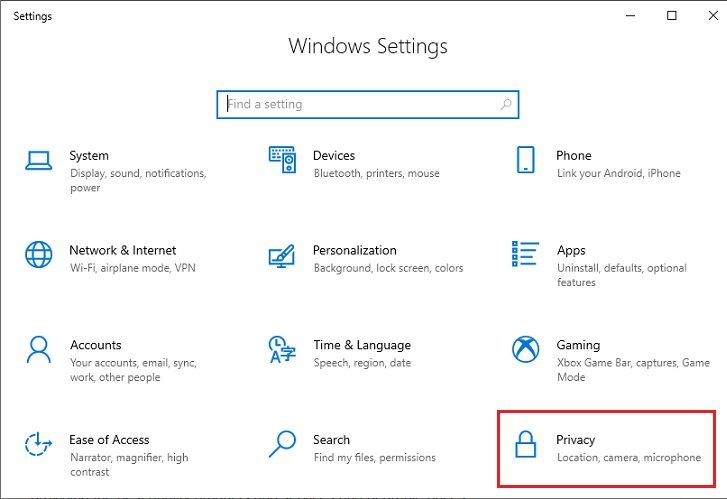
- Choose the Camera tab from the left side pane.
- Now, on the right side pane, first, turn on the toggle switch for the “Allow access to the camera on this device” option.
- Then, again turn on the switch for the “Allow apps to access your camera” option.
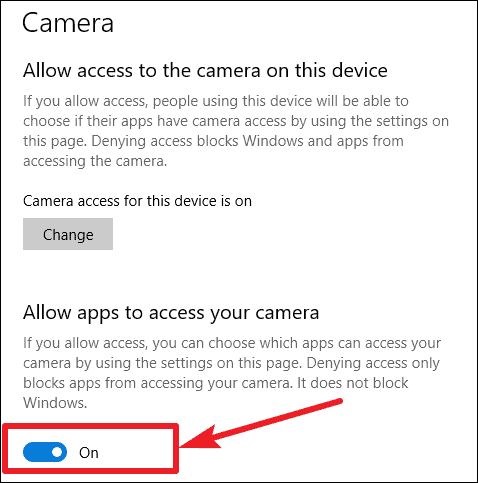
Once the process is complete, close the window, and check if giving access fixed your Lenovo integrated camera not working or not. If not, then update your camera drivers.
Solution2: Update Your Camera Drivers
Outdated drivers result in most of the camera and other problems you face on your computer. Thus, you can update your Lenovo camera driver to fix the integrated webcam not working issue. You can perform the driver update process either using the Device Manager tool or downloading the drivers from Lenovo’s official website.
However, we recommend you go with the automatic process as it is a whole lot more simple, quick, and reliable compared to the manual one. There are a lot of programs available in the market to update your camera drivers and solve the Lenovo integrated camera not working with Windows 10/11. But, most of them are either paid or not compatible with most Windows OS versions.
Hence, here we like to introduce you to the Bit Driver Updater. Using this app, you can get WHQL-certified drivers downloaded instantly and automatically. Also, it will allow you to make driver backups and restore them, increasing the driver download speed. Moreover, this program will perform other essential functions with ease.
Steps To Resolve Lenovo Integrated Camera Not Working Problem Using Bit Driver Updater
Follow the steps below and they will help you download and use the latest Bit Driver Updater app on your Windows device.
- Click on the download link below and get the most recent version of Bit Driver Updater on your computer.

- Once the installation is complete, launch the application. Now, the app will automatically start scanning your computer to find outdated or corrupted drivers.
- Then, a list of drivers will be shown to you that need an update. Go with the Update All option to update each and every driver simultaneously.
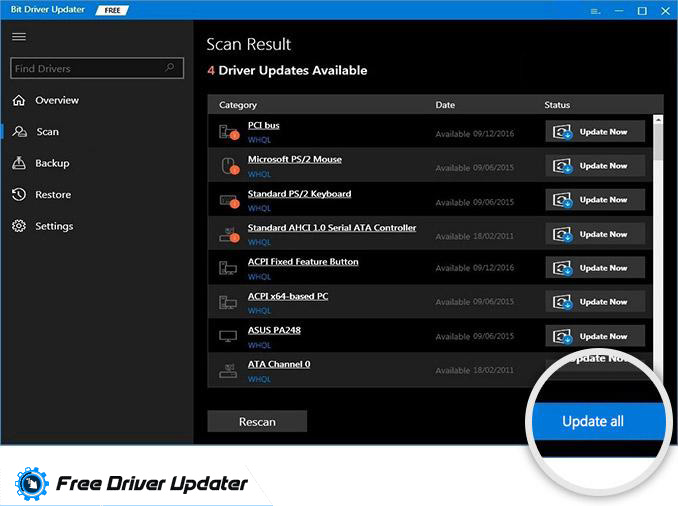
After completing the updating process, reboot the device, and check to see if performing this fixes your Lenovo integrated camera not working issue. If not, try troubleshooting your Windows PC.
Also Read: How to Fix Windows 11 Camera Not Working
Solution3: Run The Windows Troubleshooter
Whenever you are facing any kind of problem in Windows, you should run the respective troubleshooter. As the name suggests, Windows troubleshooter helps you get rid of the problem by providing optimal solutions. You can use the Hardware and Devices troubleshooter if your Lenovo integrated camera not working properly. Check out the instructions below and they will walk you through the process.
- Tap on the Windows and R keys togetherly in order to open the Run command.
- Type “ms-settings:” in the search bar given on the Run window. And then hit the Enter button on your keyboard.
- This will open the Settings window, and over there, go to the Privacy & Security option.
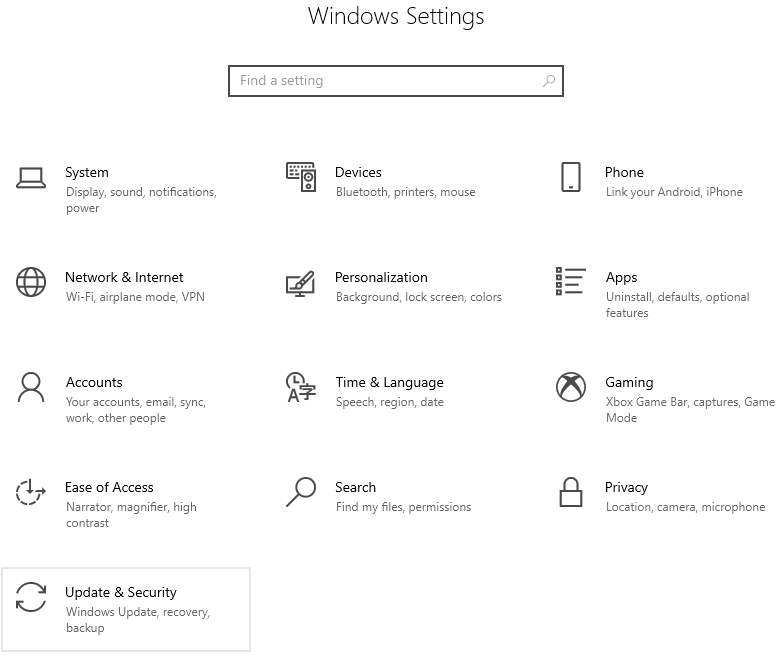
- Then, on the right pane, select the Troubleshoot tab.
- Now, go with the Additional troubleshooter’s option from the “Recommended troubleshooting” heading.
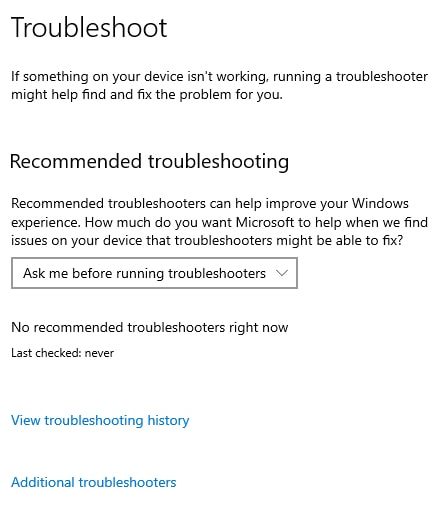
- After that, under the “Find and fix other problems” section, click on the Hardware and Devices option to expand it. Then, select the Run the troubleshooter button to start to proceed further.
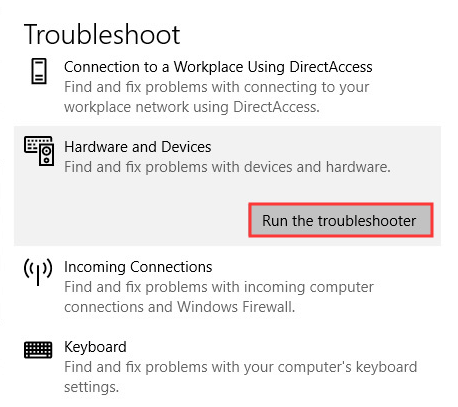
- Give your computer some time to search for the cause behind this issue. Then, follow the steps provided by the troubleshooter to fix the problem.
Once you are done with the troubleshooting process, restart the device, and the Lenovo integrated camera not working Windows 10/11 problem will be fixed.
Also Read: 0xa00f4244 NoCamerasAreAttached Error Code on Windows
Resolved: How To Fix Lenovo Integrated Camera Not Working Windows 10/11
Through this article, we learned multiple ways to get rid of the integrated webcam not working issue on Windows 11/10 devices. You can try the fixes in the same order they are shown. However, if the issue still persists, visit your nearby repair shop to check if there is any physical damage. Moreover, drop a comment in the box given below to share your thoughts about this blog post.


