![Fix-Wi-Fi-doesn’t-have-valid-IP-configuration-Problem-[Solved] Fix: Wi-Fi doesn’t have valid IP configuration problem [Solved]](https://wpcontent.freedriverupdater.com/freedriverupdater/wp-content/uploads/2020/06/05152232/Fix-Wi-Fi-doesn%E2%80%99t-have-valid-IP-configuration-Problem-Solved.jpg)
Using a WiFi network has many benefits alongside some consequences like the “WiFi doesn’t have a valid IP configuration” error. In other times, the WiFi may simply stop working due to a variety of other reasons.
When you open the Network Troubleshooter, it may show that the “WiFi doesn’t have a valid IP configuration” error but the Network Troubleshooter may not be able to fix this error completely. In this case, you will need to find alternative solutions to the problem then, which is why we have prepared this blog to compile the effective solutions for the “WiFi is not having a valid IP configuration” problem.
Before we look at the solutions, let us first understand the probable causes behind this error.
Reasons Behind “WiFi Doesn’t Have a Valid IP Configuration” Error:
- Users may receive this error message when there is an issue with the TCP/IP stack. The TCP/IP stack is a bundle of network protocol layers. Sometimes, this can function negatively to disrupt the internet service.
- Other reasons behind the WiFi configuration problem are as follows:
- Faulty network
- Incorrect network settings
- Hardware Issues
- Network Problems from the network operator
- When the Windows network services is disabled
- Network driver adapter related error
Solutions to Fix “WiFi Doesn’t Have a Valid IP Configuration” Problem:
You can fix the problem of “WiFi is not having a valid IP configuration” by one of the following ways. Read and discover the method that can work best for you.
Method 1: Reset the TCP/IP
Here are the steps to reset the TCP/IP stacks:
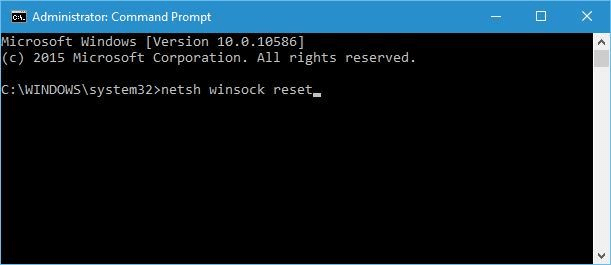
Step 1: Launch the Command Prompt and choose to run it as an administrator. If prompted for further permission, then click “Yes.”
Step 2: Write the following commands, followed by pressing the Enter key after each command:
- netsh winsock reset
- netsh int ip reset
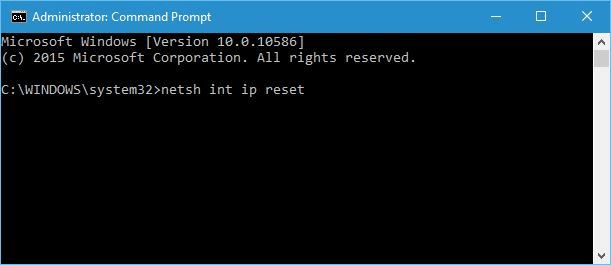
After the command execution finishes, then check if the WiFi configuration problem is resolved on your Windows 10 PC. If not, then don’t worry as there are plenty of other solutions below for you to try.
Also Read: How To Fix “Bluetooth Peripheral Device Driver Not Found” Error
Method 2: Renew the IP Address
You can go for this solution to resolve the WiFi lacks a valid IP configuration error as per the below steps.
Step 1: Type “cmd” in the Start menu search box and open the Command Prompt with administrator access.
Step 2: Then, type the following commands and press Enter after each command:
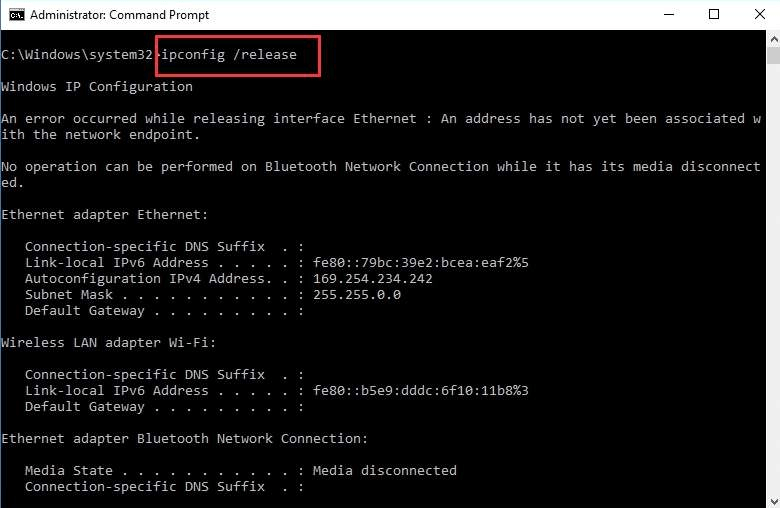
- ipconfig /release
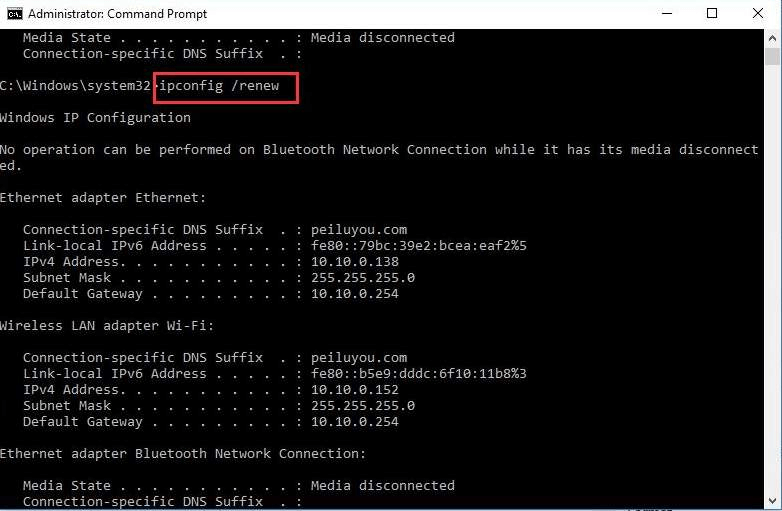
- ipconfig /renew
Step 3: Finally write the last command “exit” and hit the Enter key after this command.
Restart the system and see if your WiFi network is working now.
Method 3: Reset the IP Address Manually
If you are seeing an error message which says the WiFi doesn’t have a valid IP configuration, then setting the IP address manually is another method of addressing this error.
Usually, when the users connect to the WiFi network, they are assigned with an IP address. This process is performed by DHCP. So, an issue with the invalid IP configuration indicates some sort of problem with the DHCP. You can set an IP address manually with the help of the guide below.
Step 1: Go to Network Connections from the Start menu.
Step 2: Hit on the “Change adapter options” in the Network status window.
Step 3: Using the right-click action, click on the wireless connection to choose the “Properties” option from the context menu.
Step 4: Highlight the “Internet Protocol Version 4 (TCP/IPv4)” by clicking upon it and then select the “Properties” option again.
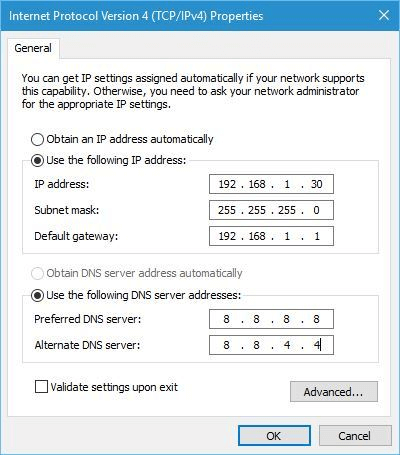
Step 5: Click on the “Use the following IP address” and “Use the following DNS server addresses.”
Step 6: Then, write the IP address, subnet mask, and default gateway, preferred DNS server and Alternate DNS server.
Step 7: Finally, press the “OK” button.
Also Know: DNS Server Not Responding on Windows: How to Fix It?
Method 4: Remove the Antivirus Software
Sometimes, the antivirus software might cause the “WiFi doesn’t have a valid IP configuration” problem. You may need to uninstall the antivirus software and see if that solves the problem. If not, then you can reinstall it back or try some other antivirus tool which will not interfere with your WiFi network and other programs running on your Windows 10 PC.
Method 5: Perform Clean Boot
You can clean boot your Windows 10 operating system to get rid of the problem. In order to clean boot, you must start Windows 10 using a minimum number of drivers and start up programs. You would know if there is any software that is creating a conflict between each other in the process with the help of reboot. Try to disable all the third party apps to check if those apps are interrupting your wireless connections.
Follow the below steps to perform clean boot:
Step 1: Type “System Configuration” in your Search box. Open the app on your desktop.
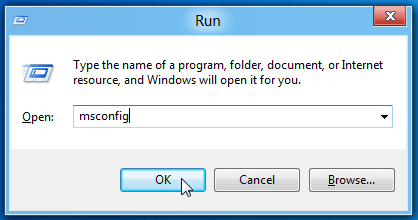
Step 2: You can also type “Run” in the Search box, and then type “msconfig” to go to the System Configuration window.
Step 3: In the System Configuration window, press on “Selective startup.”
Step 4: Uncheck the “Load startup items” option.
Step 5: On the Window, move to the third tab that is your Services tab.
Step 6: Here, tick on the “Hide all Microsoft services” checkbox. This would hide the Microsoft apps and services.
Step 7: Now, further press on the “Disable all” option.
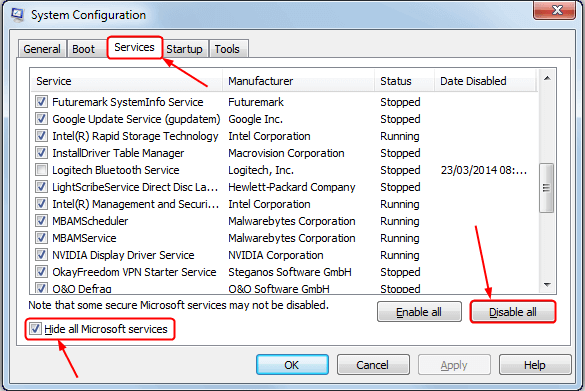
Step 8: Move back to the “Start Up” tab and then press “Open Task Manager.”
Step 9: In the Task Manager window, you would find a list of startup applications.
Step 10: Right click on all and disable them one by one.
Step 11: Alternatively, you can select the programs you want to disable and then click on the “Disable” button present in the bottom right portion of the screen.
Step 12: Close Task Manager once you have disabled all the Startup applications. Click on “Apply” and then “OK” in your System configuration window.
Step 13: Finally reboot your system .
If your problem is fixed then it would mean one of these programs was causing trouble. However, if your problem is not solved, you can once again enable those options back.
Also Know: How to Fix Windows Modules Installer Worker High CPU in Windows 10
Method 6:Uninstall the Wireless Adapter Driver
If you are still not able to connect to your WiFi network successfully due to the WiFi invalid IP configuration error, then you can try uninstalling the damaged or outdated network driver and see if that resolves the issue. Uninstall the wireless adapter driver in the following way:
- Launch the Device Manager and expand the “Network adapter” section.
- Click right on the wireless device name and then choose the “Uninstall” option from the drop-down menu.
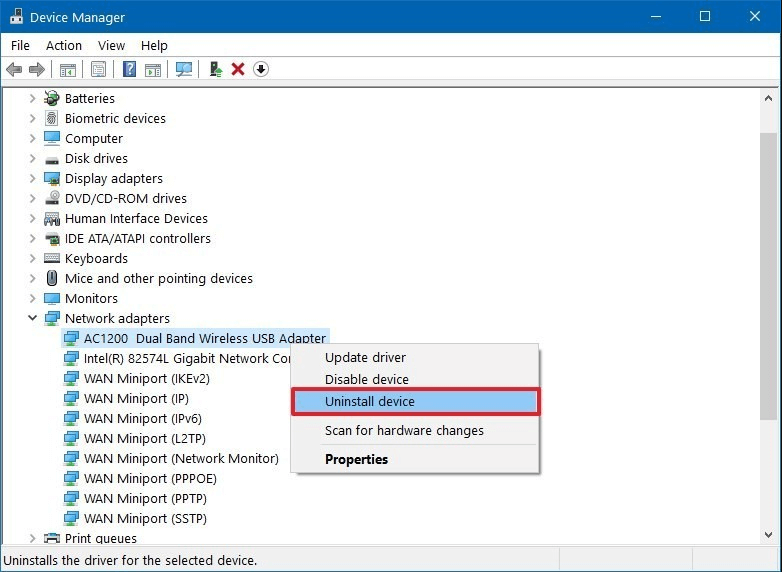
- Finally, click “OK” and let the uninstallation process complete.
- Restart the system and then let Windows reinstall the network driver adapters again.
Method 7: Update the Network Adapter Driver
Finally, if the above methods have not resolved the problem of “WiFi doesn’t have a valid IP configuration” error then it would be recommended to update the network adapter driver with the help of the best driver updater tool.
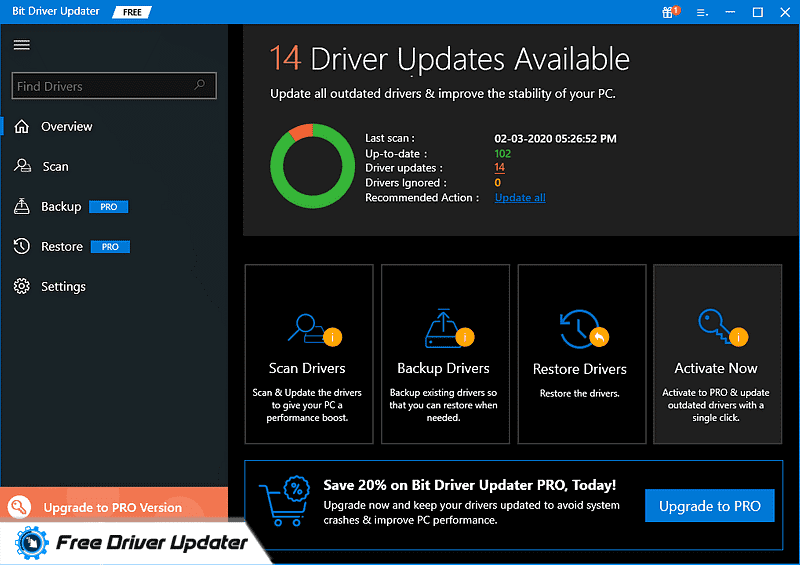
You can install the Bit Driver Updater tool on your system and with its help scan your system to detect the faulty network adapter driver. Once detected, use the tool to update it. The tool can download and install the updated version of the network driver adapter program on your system.
Ultimately, reboot your system and connect to the WiFi network without any hassles.
Fixed: Wi-Fi Doesn’t Have Valid IP Configuration
It is one of the most frustrating things when the WiFi stops working. But now you know what to do when your WiFi is not working because of the “WiFi doesn’t have a valid IP configuration” error.
Let us know in the comments section which method worked best for you out of the several solutions we listed down for you in the above segment of the blog and also feel free to add other suggestions.


