A precise & easy tutorial on how to fix Lenovo keyboard not working on Windows 10, 8, 7 PC.
The keyboard backlight feature comes preinstalled on most Lenovo computers. Although, this feature lightens up your darker days. But, it can be annoying too when this abruptly stops working properly.
Quite lately, many Lenovo PC users reported that the keyboard backlight feature isn’t functioning or has become completely unresponsive. If the issue you are encountering sounds slightly comparable to this inconvenience, then this guide can help you out.
However, before we move towards the solutions, it would be better enough to know the reasons why you are facing this issue. Below we have mentioned the major causes of this issue.
- Incorrect hardware settings.
- Due to the old version of the Windows operating system.
- The keyboard backlight feature is disabled.
- Outdated device drivers.
- Newly installed software is conflicting with the backlight feature.
Most Workable Solutions to Fix Lenovo Keyboard Backlight Not Working on Windows 10, 8, 7
Below we discuss the numerous tactics to fix Lenovo Keyboard backlight, not working issues. Let’s read them!
Important: Before you try other advanced solutions, try to restart your computer and then check to see if the issues resolve. Because sometimes, rebooting the machine may resolve issues and errors. But, unfortunately, if this doesn’t work for you, then seek help from the solutions mentioned below.
Solution 1: Using Hotkeys to Turn On Backlight
Maybe, the backlight feature is disabled on your Lenovo laptop, and which eventually leads to the Lenovo backlight not working on Windows PC. Hence, before trying the advanced solutions, check to see if the backlight feature is enabled.
If not, then using hotkeys enable it: Press Fn and Space/ Esc key. Additionally, you can also customize the brightness level by holding the Fn key and pressing the Spacebar key.
Also Read: How to Fix Lenovo Laptop Keyboard Not Working in Windows 10 [2021 Guide]
Solution 2: Use Lenovo Vantage to Set Up Keyboard Backlight
Lenovo has produced a program called Lenovo Vantage to help users customize their computers. So, Lenovo PC users can use this free program to set up keyboard backlights. Here is how to fix Lenovo keyboard backlight not working using the Lenovo Vantage tool:
Step 1: Click here to download Lenovo Vantage for Free.
Step 2: Double click the downloaded file and follow the on-screen instructions to install the program on your computer.
Step 3: Once done, then check your keyboard information under the Device > Input & accessories. Later, modify the backlight as per your preference.
There you have it! After this, try to restart your PC and check if this solves the problem. If the issue persists, move on to the next solution.
Solution 3: Check For Updates
If you are running an outdated version of Windows, then it can be the reason why you are encountering glitches with your Lenovo PC. Lenovo keyboard backlight not working is one of them. Therefore, keep your Windows always up-to-date. Follow the steps below to update the version of your Windows operating system.
Step 1: Head over to the Windows Settings by hitting Windows Logo + I keyboard buttons at a time.
Step 2: Then, click on the Update & Security option.
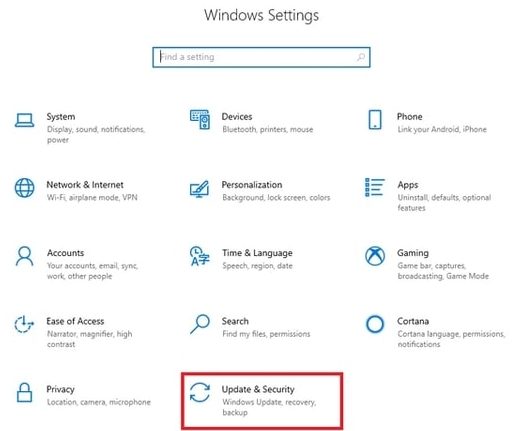
Step 3: After this, click on the Windows Update from the left pane and then, click on the Check for Updates.
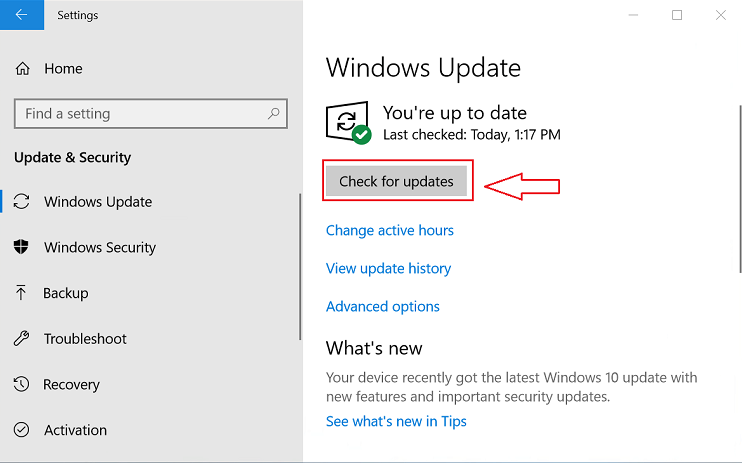
That’s it! Now, download and install the available update. Once done, then check to see if this works. If not, then move on to the next solutions.
Also Read: Fix USB Keyboard and Mouse Not Working Issue on Windows 10/8/7
Solution 4: Remove Conflicting Apps
If the backlight of your Lenovo keyboard stops working just after the installation of a new application, then there are possibilities that the lately installed program is conflicting with the functionality of the backlight feature. Hence, you need to remove the conflicting software. To do so, follow the steps shared below:
Step 1: Altogether press Windows + X keys to invoke the Quick Access Menu.
Step 2: Then, select Apps and Features from the menu list.
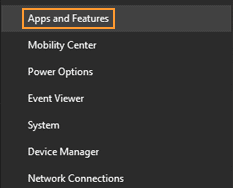
Step 3: And, select the newly installed program.
Step 4: Next, click Uninstall.
Now, wait and let uninstallation complete. Once done, then reboot your computer to validate the new changes.
Solution 5: Troubleshoot the Hardware Issues
You may encounter a Lenovo keyboard backlight not working due to some hardware glitches. Therefore, you need to detect them in order to fix the problem. Follow the steps below:
Step 1: Launch Windows Settings.
Step 2: Click on the Update & Security option.

Step 3: Then, choose Troubleshoot from the left pane.
Step 4: Next, make a click on the Hardware and Devices option.
Step 5: Lastly, click Run the Troubleshooter.
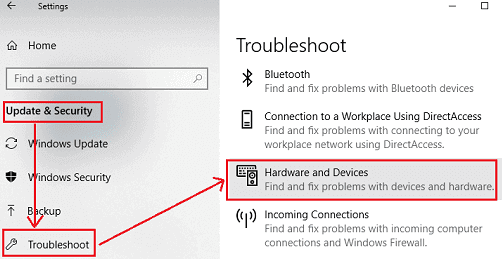
Now, wait until the troubleshooting process is complete.
Also Read: HID Keyboard Device Driver Download and Update for Windows 10, 8, 7
Solution 6: Update your Device Drivers
If none of the above suggestions worked for you, then try to update your Windows drivers. Faulty, broken, or outdated drivers are the major culprits behind this issue. Therefore, you should make sure that your Windows drivers are always associated with their latest versions.
The users can update their drivers either manually or automatically. However, to update drivers manually, you need to have enough time as well as good technical knowledge. But, don’t worry, if you are running out of time. There are numerous driver updaters available to automate the task. However, all of them aren’t safe to use, out of all, Bit Driver Updater is the best and reliable way to update your outdated drivers.
Unlike others, this software provides only WHQL tested and certified drivers. Along with this, the software possesses the potential to boost up the overall performance of your PC by up to 50%. Now, have a look at the steps shared below to know Bit Driver Updater works.
Step 1: First of all, download the Bit Driver Updater from the button below.
Step 2: Then, run the downloaded file and follow the on-screen instructions to complete the software installation.
Step 3: Once done, then launch the software on your computer and wait for a while until it scans your device for faulty or corrupted drivers.
Step 4: After this, review the scan results.
Step 5: Navigate to the driver you wish to update and click on the Update Now button placed next to the driver.
Step 6: Alternatively, you can also click on the Update All button.
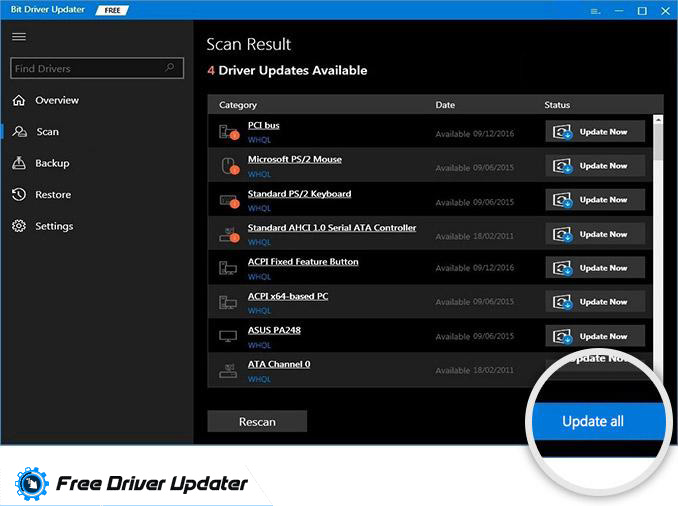
See how simple it is to repair the broken drivers through Bit Driver Updater. These were a few steps that one needs to follow in order to fix all faulty drivers. With this driver updater, you can also fix the numerous issues related to your Windows like BSOD (Blue Screen of Death) errors, frequent system failures, and a lot more. In addition to this, the software also provides 24/7 technical support as well as a 60-days complete money-back guarantee.
Lenovo Keyboard Backlight Not Working on Windows PC: SOLVED
So, that was all about how to fix Lenovo keyboard backlight not working on Windows 10, 8, 7 PC. Hopefully, this tutorial helps you get back to the light of your Lenovo keyboard.
Do let us know in the comments below if you have any questions or further suggestions. Also, tell us which solution worked best for you.
Lastly, before you leave, do subscribe to our Newsletter for reading more technical troubleshooting write-ups just like this one. Along with this, you can also follow us on Facebook, Twitter, Instagram, and Pinterest.


