!['Windows-Has-Detected-An-IP-Address-Conflict'-Error-[Fixed] 'Windows Has Detected An IP Address Conflict' Error [Fixed]](https://wpcontent.freedriverupdater.com/freedriverupdater/wp-content/uploads/2020/09/30181732/Windows-Has-Detected-An-IP-Address-Conflict-Error-Fixed.jpg)
If you see “Windows has detected an IP address conflict” error in your Windows computer or laptop, don’t panic. Many users have reported the same error after they were unable to access the Internet on their Windows devices. The good news is that you can easily fix this problem by yourself without the need of taking your laptop or desktop to the service center or to the repair professional. Through this guide, we’ll show you some handy and quick ways to learn how to fix Windows IP address conflict on Windows 10, 8, & 7 computers.
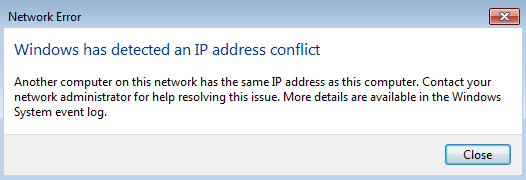
Before we kick-off the discussion, let’s first know the reason behind the sudden occurrence of this frustrating ‘Windows has detected an IP address conflict’ problem.
What is Windows IP Address Conflict?
An Internet Protocol, commonly called IP address is a unique numerical label assigned to each computing device when it is connected to the Internet. It is given that two different devices cannot share the same IP address on any given network. However, when a single IP is shared between computers, it results in IP address conflicts in Windows. As a result, users end up receiving Windows has detected an IP address conflict message on their computer systems.
If you are also one of those troubled users facing the same IP conflicts problem, then follow our guide below to know how to fix it.
Solutions to Fix Windows has detected an IP address conflict Error
You can resolve the Windows IP address conflict error quickly and easily by using the solutions listed below. Without wasting more time, let’s proceed with the first one, see if that helps, and then move to the next one if it doesn’t.
Way 1: Restart Your Router and Internet Modem
You may see the “Windows has detected an IP address conflict” error message on your screen if your router fails to assign a unique private IP address to a device that is connected to the network. In such a case, you can always try to give your router a fresh start. Here are the simple steps to properly restart your router to fix Windows IP address conflict error.
- Press the power button and hold it down for a few seconds to shut down your router.
- Wait for a while (at least 60 seconds), until all of your connected devices stops getting internet from your ISP.
- Now press the power button again to turn on your router.
- When the router and modem restarts, reconnect your device to the Internet and check if the Windows detected IP address conflict message is gone or not.
If it’s still there, move to the next workaround.
Also Know: How to Fix Windows Defender Error Code 0x8e5e021f
Way 2: Release and Renew the IP address in Your Windows
Releasing and renewing your computer’s IP address refreshes the Internet connection and helps fix most of the minor glitches and errors, including the ones causing IP address conflicts in Windows. To do so, follow the steps below:
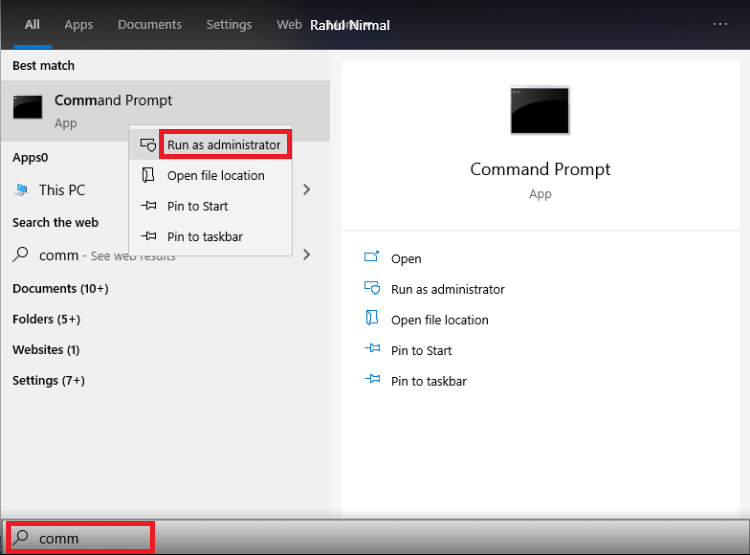
- In the search box, type cmd or command prompt, right-click on the Best match result and then choose Run as administrator option from the context menu.
- In the command prompt window, copy and paste the following commands and press the Enter key after each one.
ipconfig /release

ipconfig /renew
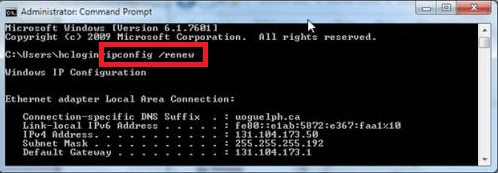
- After executing the above-written commands, reboot your computer, and check if that helps fix Windows has detected an IP address conflict issue.
Read More: Fix: WiFi Doesn’t Have Valid IP Configuration Problem
Way 3: Remove Your Static IP Address
As the name suggests, a static IP address is simply a manually configured address that does not change. Having a static IP address isn’t ideal for all situations and is often known to cause a lot of network-related problems. Hence, if you’re still getting the Windows has detected IP address conflict error, then it is advised to use a dynamic IP address instead.
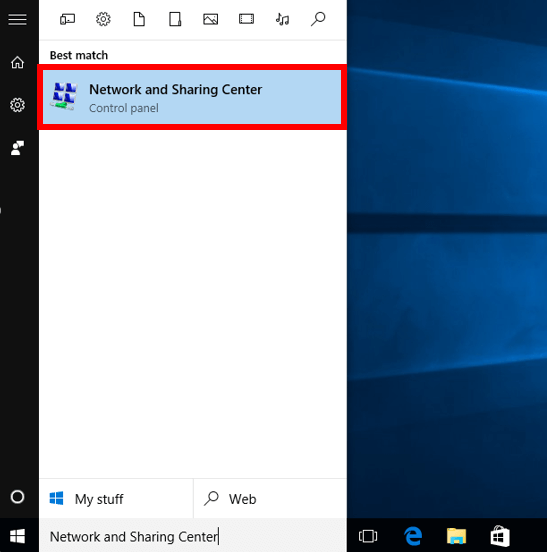
- In the search box, type Network and Sharing Center, and select the Best match result.
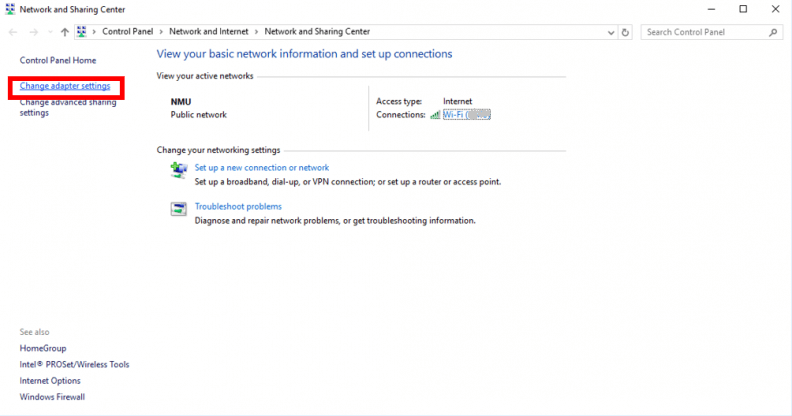
- From the left-side pane, choose Change Adapter Settings option.
- Right-click the network connection adapter and choose the Properties option from the context menu.
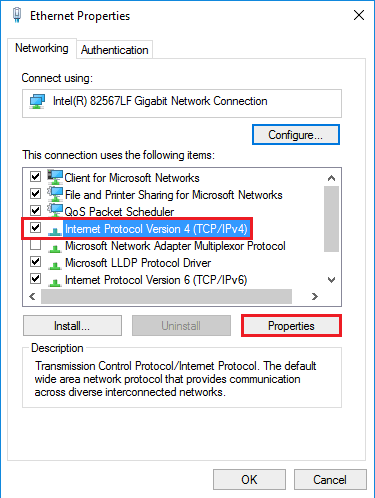
- In the next window, select Internet Protocol Version 4 (TCP/IPv4) and press the Properties button.
- Click the Obtain IP address automatically and Obtain DNS server address automatically radio buttons from the General tab.
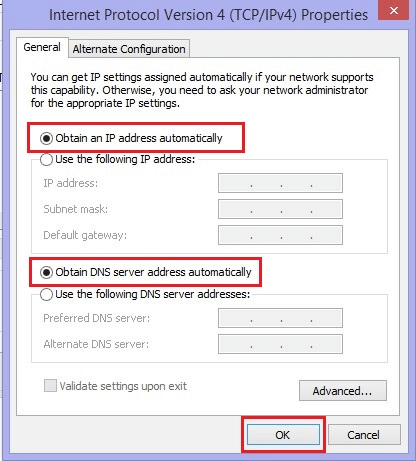
- Click the Ok button.
- At last, restart your PC and see if that Windows IP address conflict error is resolved or not.
Also Read: How to Fix Inaccessible Boot Device Error on Windows 10
Way 4: Update Your Network Interface Card (NIC) Driver
The presence of outdated and defective network card drivers can also cause ‘Windows has detected an IP address conflict’ error. Hence, if your system is throwing IP address conflicting error messages, then it is recommended to update all of your out-of-date drivers to the latest available versions.
The process of updating drivers can be done through manual techniques such as by using Windows Device Manager and in an automatic manner with Bit Driver Updater. We recommend the latter as this automatic utility not only makes the driver updating process effortless but also eliminates the risk of human errors. Here are the simple steps to use this tool to update your network drivers.
- Download Bit Driver Updater for free using the given link.
- After installing, launch the application and choose Scan Drivers option.
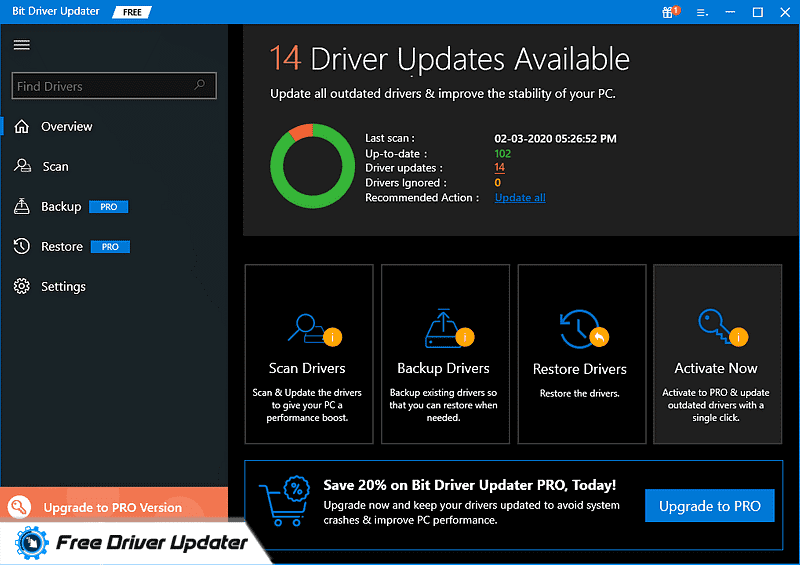
- After the driver scan is done, review the results, and then click the Update Now button next to the network card driver.
Windows IP Address Conflict Error: Fixed
Through this post, we discussed how to fix the Windows has detected an IP address conflict issue on Windows 10, 8, and 7 PC. Furthermore, if you know some other effective solutions that helped you to fix the IP address conflicts, then do let us know about them via the comments section provided below. Lastly, if you found this article helpful, then don’t forget to share it with others.


